Divi is an incredibly user-friendly WordPress theme builder that turns the whole process into a straightforward, drag-and-drop affair. Imagine being able to update layouts, swap out images, or even change fonts without ever touching a line of code. That’s the kind of freedom DIVI offers, and the best part? You don’t need to be a tech wizard to use it.
You don’t need to be a tech wizard to use Divi
This blog post aims to demystify the process, breaking down how you can make changes to your WordPress site using DIVI, all in layman’s terms. By the end, you’ll see how easy it is to bring your creative vision to life, with no technical expertise required.
So grab a cup of your favourite beverage and let’s dive in!
Getting Started: Make Sure Divi is Installed
(Skip this section if Pressific built your website)
Before we go any further, ensure Divi is installed and activated on your WordPress site. If you haven’t got it yet, you can download it from the Elegant Themes website and install it via your WordPress admin panel.
- Log into your WordPress Dashboard.
- Navigate to Plugins > Add New.
- Upload the Divi.zip file and activate it.
Changing Layout and Design Elements
Sections, Rows, and Modules
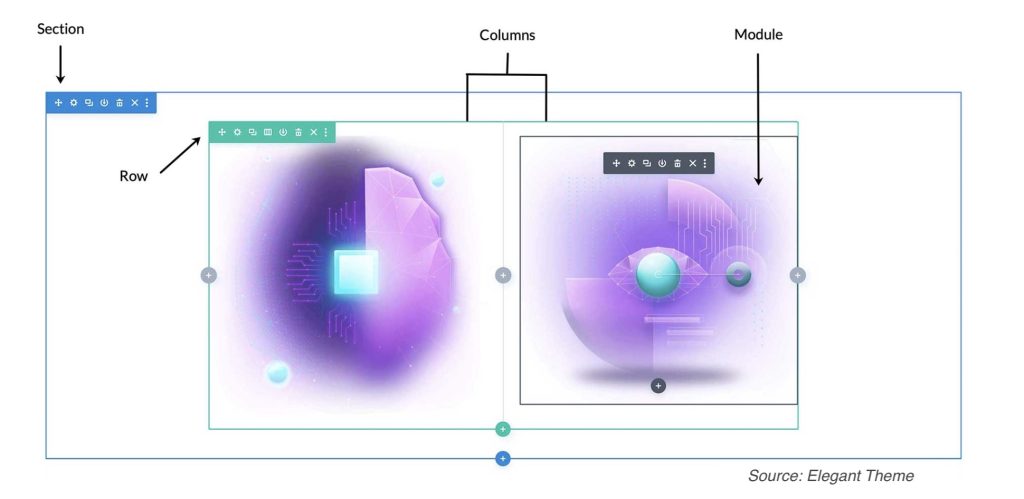
Divi is based on a structure that comprises sections, rows, and modules:
- Sections: The biggest containers, like your header, body, and footer.
- Rows: These sit inside sections and can be divided into columns.
- Modules: The individual elements like text, images, and buttons.
Making Changes
- Access the Visual Builder: Click on Enable Visual Builder on the page you want to edit.
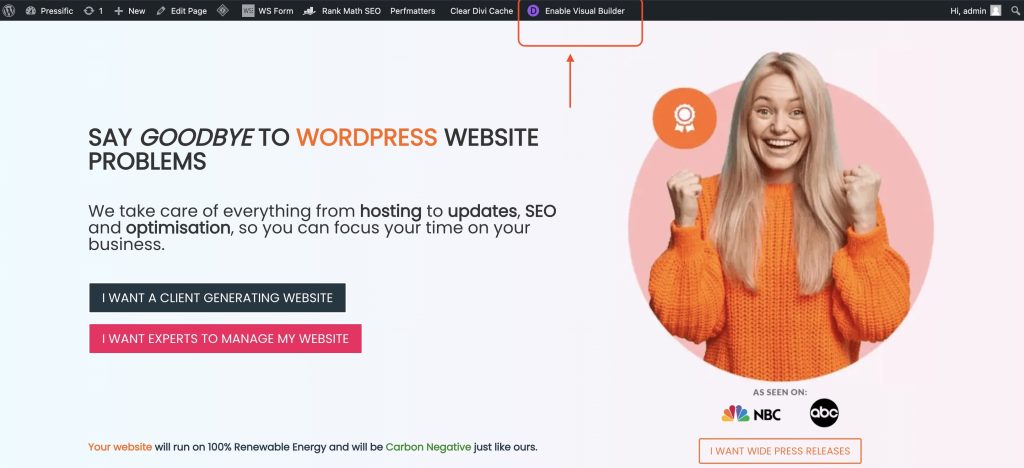
2. Select a Section: Hover over the section, row, or module you’d like to change and click on the grey settings (cog ⚙️) icon.

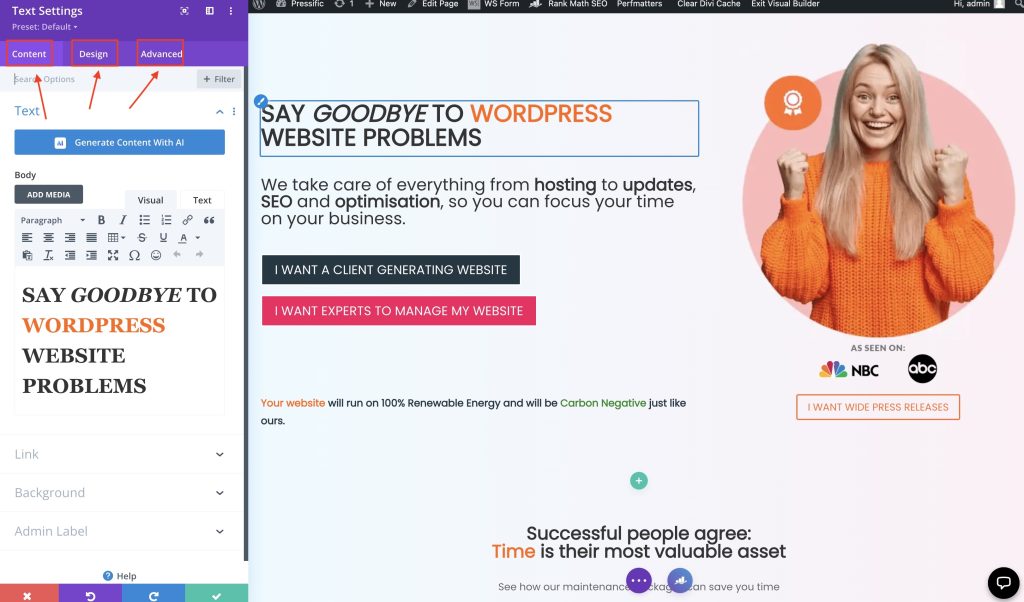
3. Edit: A settings panel will appear with various options. Here you can change background colours, fonts, add borders, and more.
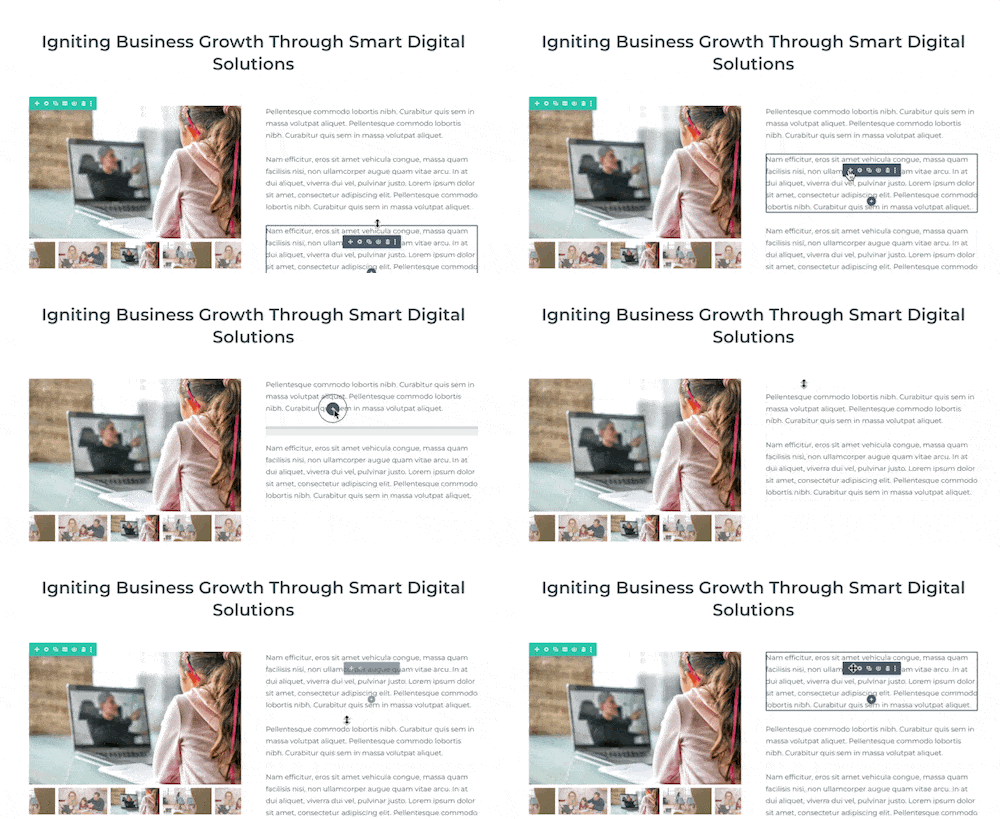
4. Drag and Drop: To move elements, simply drag and drop them where you want them.
Adding and Changing Images
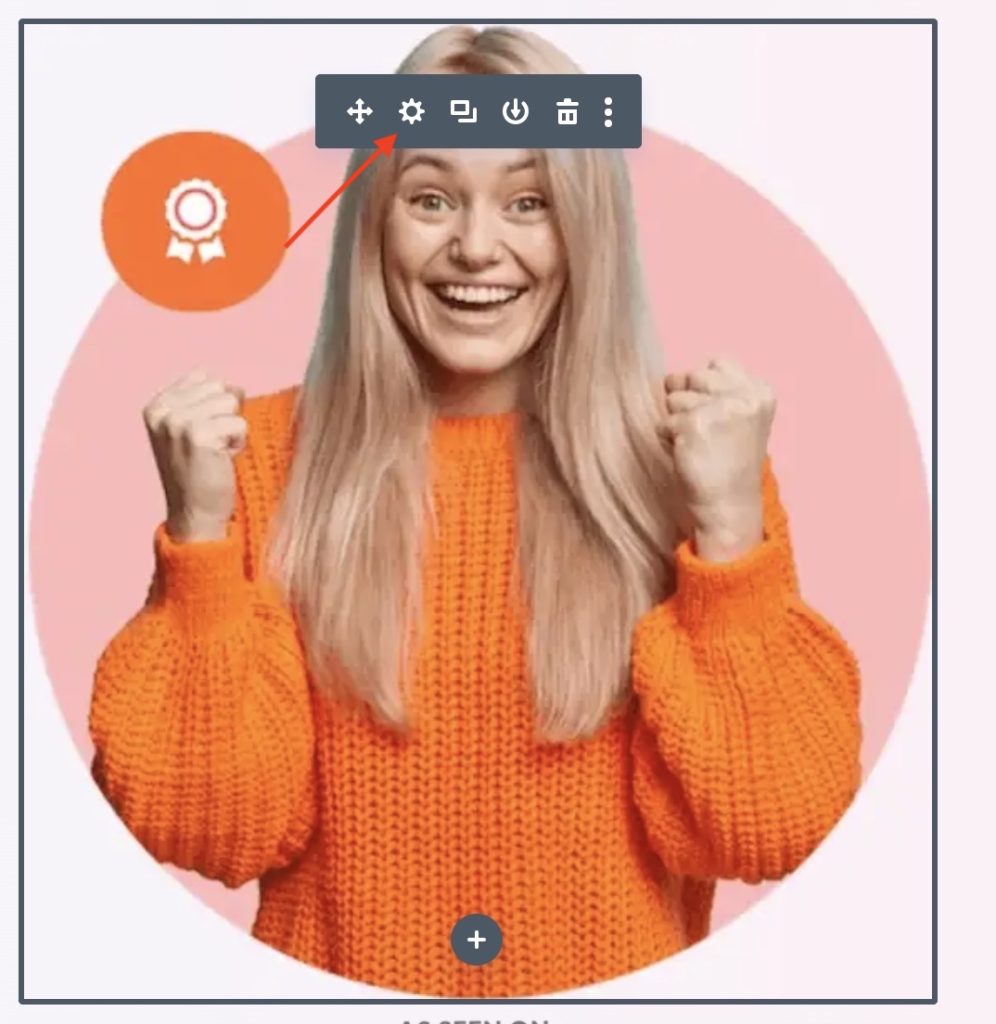
Step 1
Changing images in Divi is a straightforward process. Simply hover over the image you’d like to update and click on the cog icon that appears.
Step 2
This will open a settings panel where you can upload a new image or tweak existing settings.
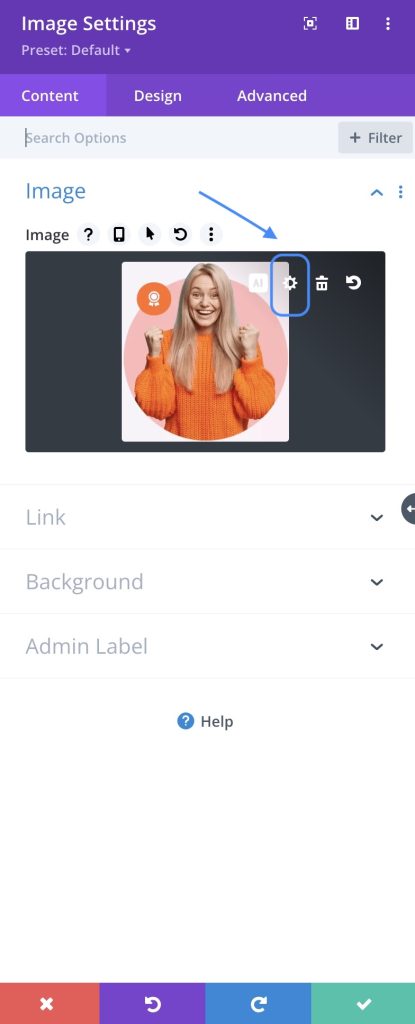
Selecting the cog icon reveals the Media Library, offering you a range of image choices. Here, you have the added convenience of effortlessly dragging and dropping new images directly into the library from your computer.

Adding New Elements
To add a new element:
- Click on the grey “+” icon that appears when you hover over a section or row.
- Choose between adding a new section, row, or module.
- Customize it as per your liking using the settings panel.
Advanced Customisation
For those who are comfortable with coding, Divi doesn’t disappoint:
- CSS Customisation: Add custom CSS in the module’s settings under the ‘Advanced’ tab.
- JavaScript: Inject JS code if you need specific functionalities.
Saving and Exiting
Once you’re happy with your changes:
Clicking on the purple circle featuring three dots enables you to save all sections of your website simultaneously. Once selected, a ‘Save’ button will appear in the right-hand corner for you to confirm and secure your changes.

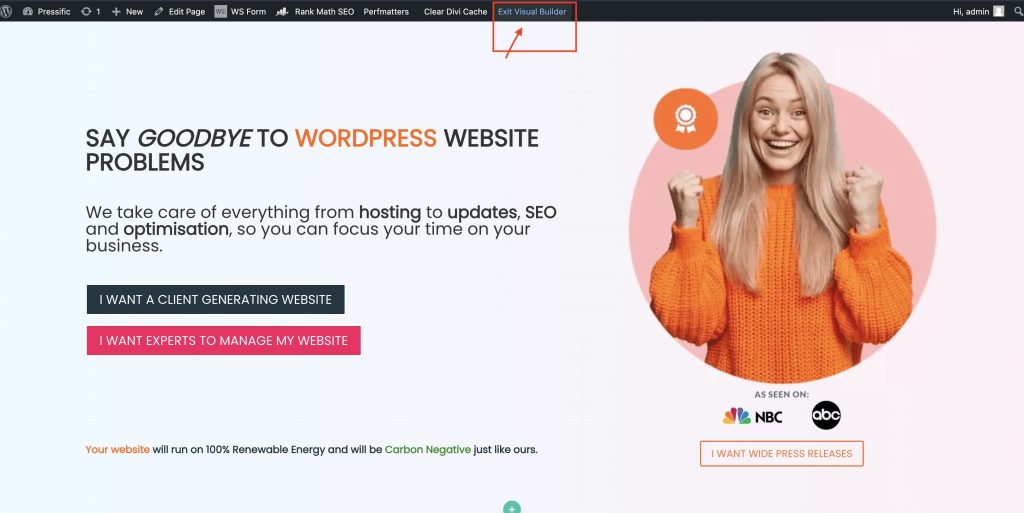
Exit: To exit the Visual Builder, click the Save button at the bottom and then Exit Visual Builder.
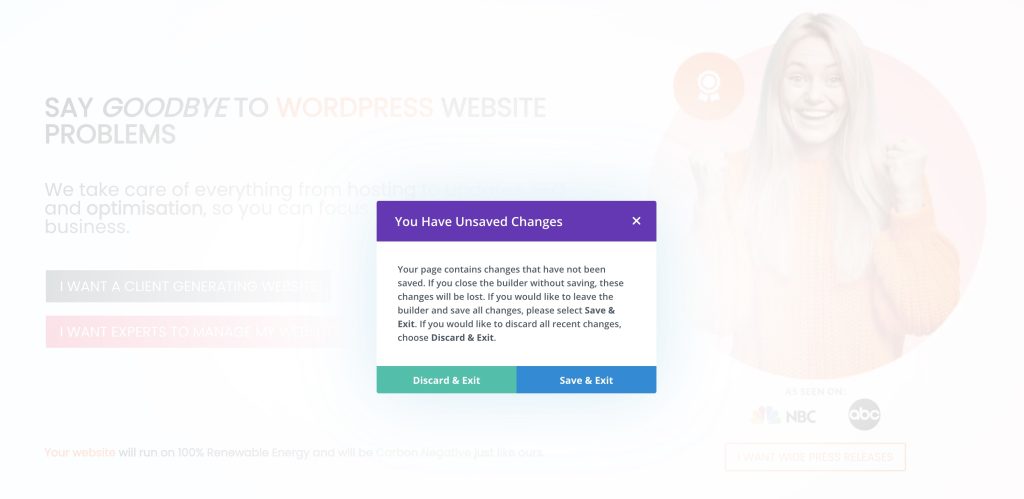
Don’t worry, if you forget to save and try to exit the visual builder there will be a pop-up presenting you with two options. Simply choose ‘Save and Exit’ to finalise your changes.
Wrapping Up
Divi’s power lies in its simplicity. It offers endless customisation possibilities without overwhelming you. So go ahead, tweak, modify, and transform your WordPress site to reflect your vision. And remember, you don’t need to be a tech guru to make it happen.
Hope this helps you get started with making changes using Divi on WordPress. Any questions? Feel free to drop them below!
Also, see
Divi vs. Elementor: A Comprehensive Comparison
FAQ
Is Divi easy for beginners?
Absolutely, Divi is a fantastic choice if you’re a beginner or not particularly tech-savvy. Its intuitive, drag-and-drop interface allows you to see changes in real-time, making it easier for you to create a professional-looking website without needing to touch a line of code. This user-friendly approach is actually one of the reasons why Pressific chose Divi. They wanted to empower their customers to make changes independently, without always having to rely on technical support.
Now, if you’re someone who enjoys diving into the nitty-gritty of code, you might find platforms like Elementor more to your taste, as it’s often considered a top choice for the more technically inclined.
Is Divi really that good?
Well, the answer depends on what you’re looking for. If you’re a beginner or someone who wants a hassle-free, no-code approach to web design, then yes, Divi is a solid choice. It offers a wealth of features, including a drag-and-drop editor and real-time visual feedback, which makes creating a website pretty straightforward.
One of the standout points for Divi is its versatility. It’s not just for small businesses or personal blogs; even large enterprises find value in its extensive features and design capabilities. Additionally, the platform regularly rolls out updates and new features, so it’s continually evolving to meet user needs.
However, no tool is perfect. If you’re a coding aficionado looking for deep customization capabilities, you might find platforms like Elementor more aligned with your needs. Elementor tends to be the go-to for those who like to delve into the technical side of things.
To sum it up, Divi is a robust, user-friendly platform suitable for a wide range of users, particularly those without a technical background. So, in that context, yes, it’s pretty darn good.
Is Divi easier than Elementor?
When it comes to ease of use, Divi and Elementor cater to slightly different audiences, making the “easier” option a bit subjective. If you’re a beginner or someone who’s not keen on diving into code, Divi is often considered more straightforward. Its drag-and-drop interface and real-time visual feedback simplify the design process, making it easier for you to create and edit your site without much of a learning curve.
Elementor, on the other hand, has a reputation for being a coder’s playground. It provides more granular control over design elements if you’re comfortable with HTML, CSS, and even some JavaScript. That’s not to say Elementor is overly complex; it also offers drag-and-drop functionalities. However, its interface can be a bit more overwhelming for complete beginners due to the extensive customization options available.
So, if you’re looking for an easy-to-navigate, no-code-required platform, Divi might be more your speed. On


